OVERLAY - Command of GNU Linker Scripts
Preface
之前在查阅AT的用法时偶然发现了OVERLAY这个关键字,感觉发现了新大陆,本来想马上实践下,奈何打工人要先做好自己本职工作,最近又比较忙,就拖到了现在。话不多说,开始吧。
Content
首先来看这个关键字是做啥的。
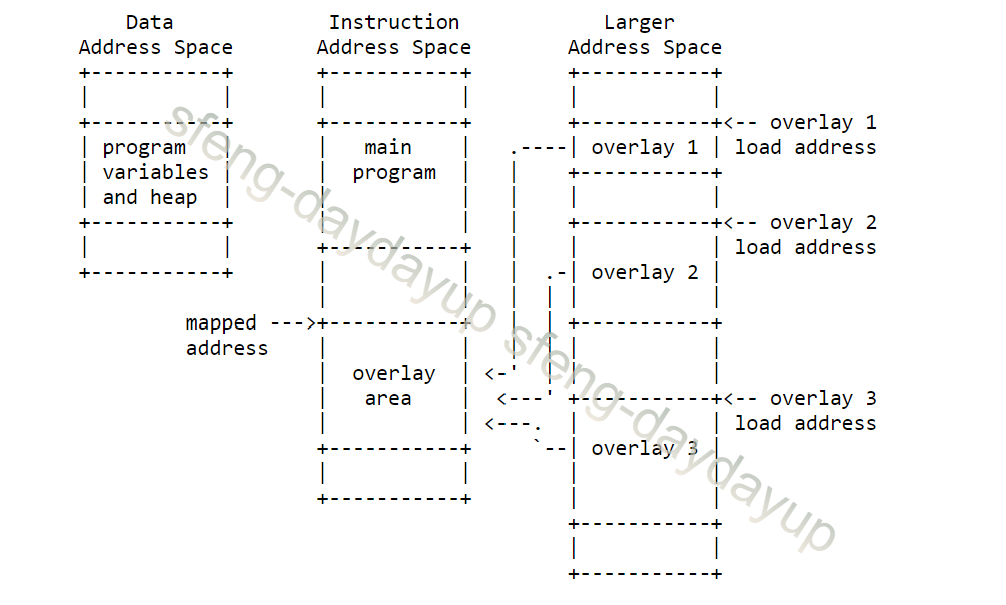
The OVERLAY command provides an easy way to describe sections which are to be loaded as part of a single memory image but are to be run at the same memory address. At run time, some sort of overlay manager will copy the overlaid sections in and out of the runtime memory address as required, perhaps by simply manipulating addressing bits. This approach can be useful, for example, when a certain region of memory is faster than another.
简单来说就是可以在编译的时候把不同功能的程序的VMA设为同一个地址,而LMA设为不同的地址。这里不同功能的程序可以理解为不会同时运行,可以适用以下场景:
- 不同的程序在不同的阶段运行,只要在相应的阶段load进来就可以。
- 运行内存有限,只能部分加载。
- 某些程序有security需求,运行过后就不在运行。
- 如上面英文文档里说的,某块特定memory速度较其他region的memory速度快,为了满足performance需求,运行程序要copy到这里来运行。
应该还有其他应用场景,大家可以根据需求运用。需要注意的是,对memory的分配要谨慎,各个section之间的boundary要清晰,不然很容易出错,这里上张文档里的图示。
 下面直接上code:
1
2
3
4
void __attribute__ ((section(".test1"))) test1_func(void)
{
        printf("this is %s\n", __func__);
}
1
2
3
4
void __attribute__ ((section(".test2"))) test2_func(void)
{
        printf("this is %s\n", __func__);
}
1
2
3
4
void __attribute__ ((section(".test3"))) test3_func(void)
{
        printf("this is %s\n", __func__);
}
1
2
3
4
void __attribute__ ((section(".test4"))) test4_func(void)
{
        printf("this is %s\n", __func__);
}
1
2
3
4
5
6
7
8
9
10
11
12
13
14
15
16
17
18
19
20
21
22
23
24
25
26
27
28
29
30
static void copy_func(int index)
{
        memcpy((void *)0x8200, (void *)(0x8280 + index * 0x80), 0x14);
}

void test_mgr(int count)
{
        int index = count % 4;

        switch (index) {
        case 0:
                copy_func(index);
                test1_func();
                break;
        case 1:
                copy_func(index);
                test2_func();
                break;
        case 2:
                copy_func(index);
                test3_func();
                break;
        case 3:
                copy_func(index);
                test4_func();
                break;
        default:
                break;
        }
}
1
2
3
4
5
6
7
8
9
int main(void)
{
        static int count = 0;
        for(;;) {
                test_mgr(count);
                count = ++count % 4;
                mdelay(1000);
        }
}
1
2
3
4
5
6
7
8
9
10
11
12
13
14
15
16
17
        ......
        OVERLAY 0x8200 : AT (0x8280) {
                .test1 {*(.test1 .test1.*)}
        }

        OVERLAY 0x8200 : AT (0x8300) {
                .test2 {*(.test2 .test2.*)}
        }

        OVERLAY 0x8200 : AT (0x8380) {
                .test3 {*(.test3 .test3.*)}
        }

        OVERLAY 0x8200 : AT (0x8400) {
                .test4 {*(.test4 .test4.*)}
        }
        ......
编译过后dump一下看看:
1
2
3
4
5
6
7
8
9
10
11
12
Sections:
Idx Name          Size      VMA       LMA       File off  Algn
  ......
  2 .test1        00000014  00008200  00008280  000082bc  2**2
                  CONTENTS, ALLOC, LOAD, READONLY, CODE
  3 .test2        00000014  00008200  00008300  000082d0  2**2
                  CONTENTS, ALLOC, LOAD, READONLY, CODE
  4 .test3        00000014  00008200  00008380  000082e4  2**2
                  CONTENTS, ALLOC, LOAD, READONLY, CODE
  5 .test4        00000014  00008200  00008400  000082f8  2**2
                  CONTENTS, ALLOC, LOAD, READONLY, CODE
  ......
可以看到从test1到test4这几个section的VMA都是一样的,但LMA不同,运行的时候就是要把code从LMA copy到VMA来运行。
上面的example在一颗cortex-m3上试验成功(还需要自己再充实下code)。
- cortex-m3比较简单,不需要考虑cache什么的
- example中memory address直接hardcode了
- example中每1秒做一次功能切换,copy code from LMA to VMA,然后call function。
对于有cache的系统,可以参照reference 3中的sample code。